THM Windows Forensics 2
Task 1 - Introduction
In the previous Windows Forensics room, we learned about gathering forensics artifacts such as System Information, User Information, Files and Folders Accessed, Executed Programs and External devices connected to the system, all that from the Windows Registry.
However, the Windows Registry isn’t the only place where forensic artifacts can be found. In this room, we’ll dive into other important locations to uncover forensic evidence. Here’s what we’ll cover:
- Windows File Systems: A look at the file systems commonly used by Windows and where to find important artifacts.
- Finding Artifacts: How to locate evidence that shows program execution, file or folder usage, user knowledge, or external device activity.
- Recovering Deleted Files: The basics of bringing back deleted files and understanding their significance in investigations.
We will use tools from Eric Zimmerman’s suite to analyze these artifacts. For certain tasks, we’ll also use Autopsy, a handy digital forensics platform.
Task 2 - The FAT Filesystems
To start with, a file system is a standard way to organize bits stored on a storage device such as a USB flash drive, to make bits interpreted easily.
The File Allocation Table (FAT) file system has been the default for Microsoft OSes until Windows XP. The file system creates an index table statically allocated at the formatting time, which is stored on the device to identify clusters.

Clusters are small chunks of bits, small data regions on a disk and each file on a disk is a group of clusters. Each cluster value in the FAT table points to another cluster to identify each file’s continuity. Moreover, a root directory , which is also another table type, contains file identifiation information like filename, starting cluster, and filename length like presented below :
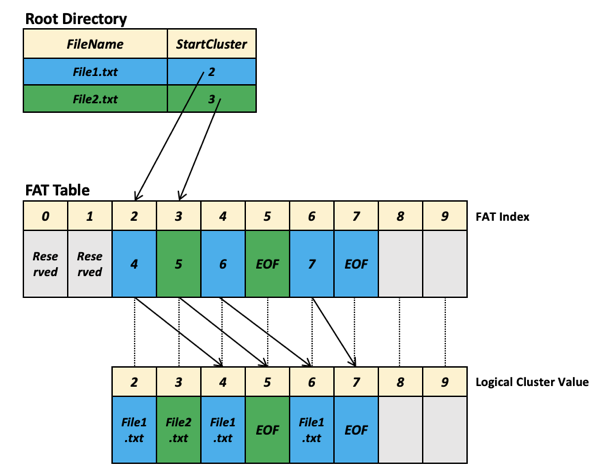
Diagrams from sqlpassion.at
FAT12, FAT16, and FAT32
Because the FAT file format divides the available disk space into clusters, the number of these depends on the number of bits used to address the cluster. Hence the different variations of the FAT file system. FAT was originally developped with 8-bit cluster addressing, and later as storage increased, FAT12, FAT16 and FAT32 were introduced.
The following table summarizes the different FAT attributes :
| Attribute | FAT12 | FAT16 | FAT32 |
|---|---|---|---|
| Addressable bits | 12 | 16 | 28 |
| Max number of clusters | 4,096 | 65,536 | 268,435,456 |
| Supported size of clusters | 512B - 8KB | 2KB - 32KB | 4KB - 32KB |
| Maximum Volume size | 32MB | 2GB | 2TB |
Even though the maximum volume size for FAT32 is 2TB, Windows limits formatting to only 32GB (for reliability, since FAT32 scales horribly). However, volume sizes formatted on other OS with larger volume sizes are supported by Windows.
The chances of coming across a FAT12 filesystem are very rare nowadays. FAT16 and FAT32 are still used in some places. However, the maximum volume size and the maximum file size (4GB - 1 file size for both FAT16 and FAT32) are limiting factors that have reduced their usage.
The exFAT file system
As file sizes have grown, the maximum file size limit of FAT32 became a real limiting factor, especially for cameras. Hence, for this reason the exFAT file system was created.
The exFAT file system is now the default for SD Cards larger than 32 GB. It has also been adopted widely by most manufacturers of digital devices. The exFAT file system supports a cluster size of 4KB to 32MB. It has a maximum file size and a maximum volume size of 128PB (Petabytes). It also reduces some of the overheads of the FAT file system to make it lighter and more efficient. It can have a maximum of 2,796,202 files per directory.
Questions
How many addressable bits are there in the FAT32 file system?
Answer : 28 bits
What is the maximum file size supported by the FAT32 file system?
Answer : 4GB
Which file system is used by digital cameras and SD cards?
Answer : exFAT
Task - The NTFS File System
As observed previously, FAT is a very basic file system. For the need of security, reliability, recovery, file and volume sizes capabilities, Microsoft have developed a newer file system caled the New Technology File System (NTFS). It was introduced in 1993 with Windows NT 3.1 but became mainstream since Windows XP.
NTFS Features
The NTFS file system introduces a lot of new features. As we discuss below, these are :
- Journaling : It keeps a log of changes to the metadata in the volumes to help the system recover from a crash or data movement due to defragmentation. This log is stored in $LOGFILE in the volume’s root directory.
- Access Controls : It defines the owner of a file/directory and permissions for each user.
- Volume Shadow Copy : It keeps track of changes made to a file using Shadow Copies. Using this feature, a user can restore previous file versions for recovery or system restore. In recent ransomware attacks, ransomware actores have been noted to delete the shadow copies on a victim’s file systems to prevent them from data recovering.
- Alternate Data Streams : A data stream refers to a sequence of data associated with a file. Files contains a Default data stream, which stores the actual content of the file but NTFS allow for an Alternate Data Stream, which helps to store additionnal metadata for like identifying the file’s origin. Malware has also been observed to hide their code in ADS.
- Master File Table : Like the File Allocation Table, there is a Master File Table in NTFS. Howerver MFT is much more extensive and is a structured database that tracks the objects stored in the volume. From a foresics point of view the following are some of the critical files in the MFT.
- $MFT : It is the first record in the volume. The Volume Boot Record (VBR) points to where it is located. $MFT stores information about the clusters where all other objects present on the volume are located. This file contains a directory of all the files present on the volume.
- $LOGFILE : It stores the transactional logging of the file system. Thus, it helps maintaining the file system integrity.
- $UsnJrnl : It stands for Update Sequence Number (USN) Journal. It is present in the $Extend record. It contains information about all the files that were changed in the file system and the reason for it. It is also called the change journal.
MFT Explorer
To continue with, MFT Explorer is one of the Eric Zimmerman’s tools used to explorer MFT files. It is available both in CLI and GUI.
user@machine$ MFTECmd.exe

MFTECmd version 0.5.0.1

Author: Eric Zimmerman (saericzimmerman@gmail.com)
https://github.com/EricZimmerman/MFTECmd

        f               File to process ($MFT | $J | $LogFile | $Boot | $SDS). Required
        m               $MFT file to use when -f points to a $J file (Use this to resolve parent path in $J CSV output).

  json            Directory to save JSON formatted results to. This or --csv required unless --de or --body is specified
        jsonf           File name to save JSON formatted results to. When present, overrides default name
        csv             Directory to save CSV formatted results to. This or --json required unless --de or --body is specified
        csvf            File name to save CSV formatted results to. When present, overrides default name
...
Furthermore, MFTECmd parses data from files created by the NTFS file system ($MFT, $Boot…). Then, we can use EZviewer to view the output of this tool.
Questions
Parse the $MFT file placed in C:\users\THM-4n6\Desktop\triage\C\ and analyze it. What is the Size of the file located at .\Windows\Security\logs\SceSetupLog.etl
After using the command .\MFTECmd.exe -f 'C:\Users\THM-4n6\Desktop\triage\C\$MFT' --csv ./, we open the csv file in EZViewer and we search for the name SceSetupLog.etl. Then, we get the file size at the 9th column.

Answer : 49152
What is the size of the cluster for the volume from which this triage was taken?
The cluster size is available in the $Boot file. After parsing it and viewing it with EZViewer, we get the answer in the ClusterSize column.

Answer : 4096
Task 4 - Recovering Deleted Files
Understanding the file systems makes it easier to know how files are deleted, recovered and wiped. As we learned, a file system stores the location of a file in a table or a database. When a file is deleted, the file system remove the entry that store the file’s location on disk. This means the location where the file existed is now available for writing. However, the file contents is still there as long as they are not overwritten by the file system while copying another file or by the disk firmware while performing .
In order to recover the data on a disk, we can either choose to understand the file strucutre of different file types to identify the specific file through an hex editor, or either choose to use a tool like autopsy to make the work for us on a disk image.
Disk Image
A disk image is a file that contains a bit-by-bit copy of a disk drive, including all the file system’s metadata, in a single file. Thus, while performing forensics, making several copies of a physical evidence is very useful :
- The original evidence is not contaminated
- The disk image file can be copied and analyzed without using any specialized hardware.
Recovering files using Autopsy
On the case of recovering files, we will use Autopsy. For a deeper walkthrough, a dedicated room is available here.
When opening Autopsy, we are greeted with the following screen :
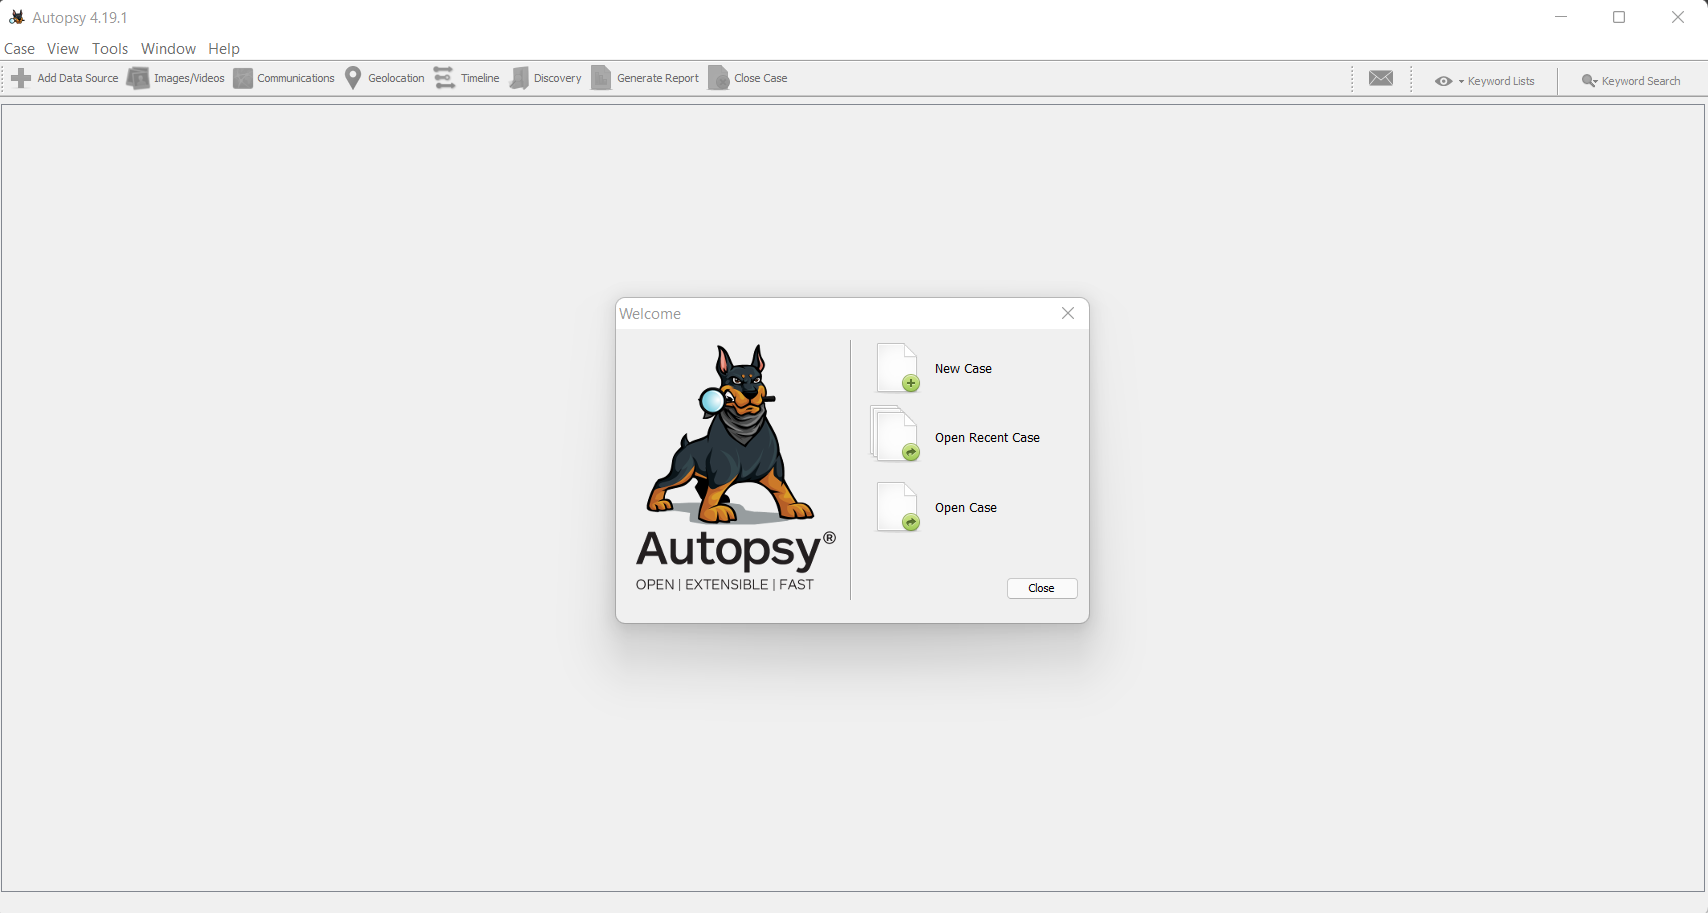
Then, we need to click on the New Case option and follow the instructions below.
- Fill the case information. Here, we can add a name, choose the directory and use the Single-User case type.
- Fill the optional case information number. Here, we don’t need to specify any of the text boxes.
- Choose a data source. Here, we need to investigate a disk image so we choose the first option and we choose Disk Image or VM File. Then we need to provide the disk image’s location.
- Configure ingest. Here, we don’t need to run the different modules like Recent Activity, Hash lookup…
After that Autopsy has processed the image, we get the following screen when we click on the usb.001 device :
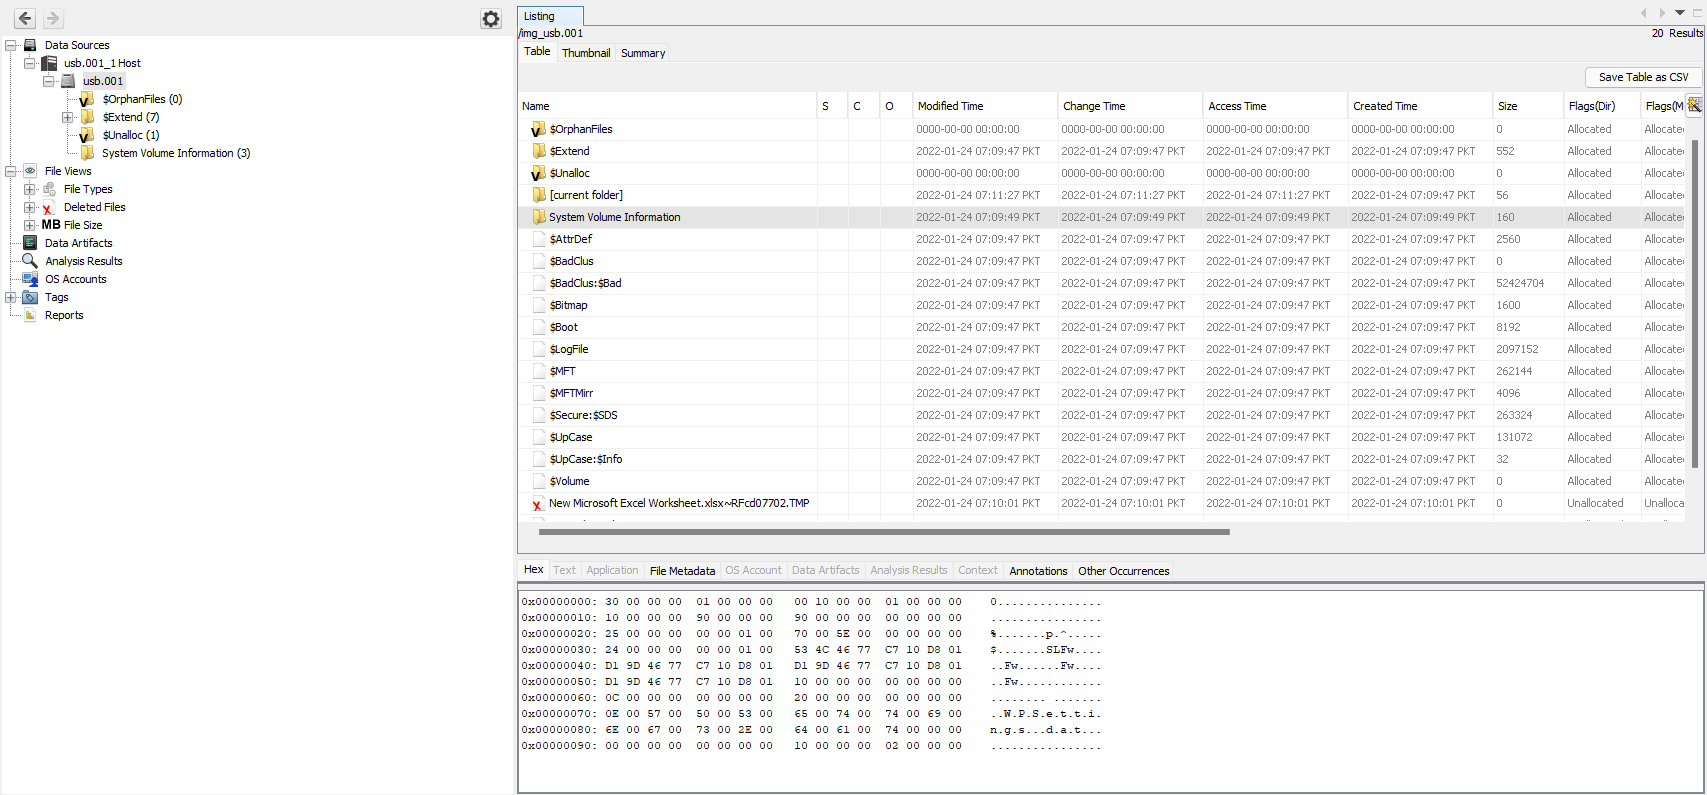
We notice that deleted files are marked with a cross, like New Microsoft Excel Worksheet.xlsx~RFcd07702.TMP on the screenshot above. To recover a deleted file, we must right-click on it and select the Extract File(s) option.
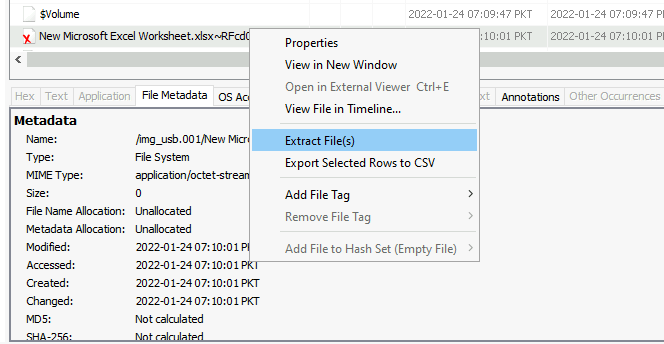
Then, we are prompted where to save the requested file.
Questions
There is another xlsx file that was deleted. What is the full name of that file?
On the right side of Autopsy’s window, there are two more shown deleted file.
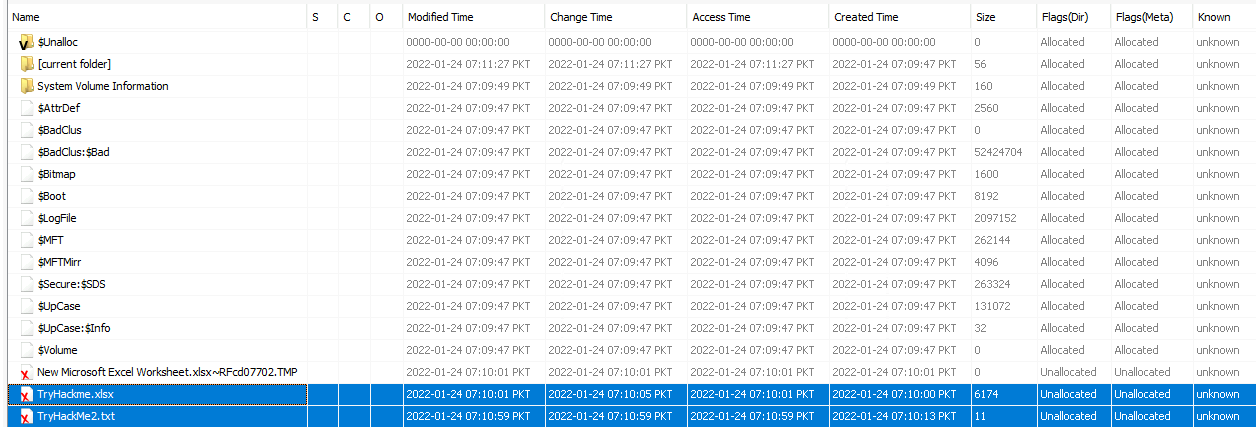
Answer : Tryhackme.xlsx
What is the name of the TXT file that was deleted from the disk?
Answer : TryHackMe2.txt
Recover the TXT file from Question #2. What was written in this txt file?
Answer : THM-4n6-2-4
Task 5 - Evidence of Execution
Windows Prefetch Files
To continue with, Windows stores information about ran program for future use, in order to quickly load programs in case of frequent use. This information is stored in prefetch files which are located in the C:\Windows\Prefetch directory.
Prefetch files use the .pf extension and contains the following information :
- Last times the program was ran
- Number of times the application was ran
- Any files and device handles used by the file
Hence, it forms an excellent source of information about the last executed programs and files. For parsing .pf files, we can use Prefetch Parser (PECmd.exe) from Eric Zimmerman.
To run Prefetch Parser, here are some usage examples :
user@machine$ PECmd.exe

PECmd version 1.4.0.0

Author: Eric Zimmerman (saericzimmerman@gmail.com)
https://github.com/EricZimmerman/PECmd

        d               Directory to recursively process. Either this or -f is required
        f               File to process. Either this or -d is required
        k               Comma separated list of keywords to highlight in output. By default, 'temp' and 'tmp' are highlighted. Any additional keywords will be added to these.
        o               When specified, save prefetch file bytes to the given path. Useful to look at decompressed Win10 files
        q               Do not dump full details about each file processed. Speeds up processing when using --json or --csv. Default is FALSE

        json            Directory to save json representation to.
        jsonf           File name to save JSON formatted results to. When present, overrides default name
        csv             Directory to save CSV results to. Be sure to include the full path in double quotes
        csvf            File name to save CSV formatted results to. When present, overrides default name
...

Examples: PECmd.exe -f <path-to-Prefetch-files> --csv <path-to-save-csv>
          PECmd.exe -f "C:\Temp\CALC.EXE-3FBEF7FD.pf"
          PECmd.exe -f "C:\Temp\CALC.EXE-3FBEF7FD.pf" --json "D:\jsonOutput" --jsonpretty
          PECmd.exe -d "C:\Temp" -k "system32, fonts"
          PECmd.exe -d "C:\Temp" --csv "c:\temp" --csvf foo.csv --json c:\temp\json
          PECmd.exe -d "C:\Windows\Prefetch"
Windows 10 Timeline
In addition to, Windows 10 stored recently used applications and files in an SQLite database called Windows 10 Timeline. This can be a source of information about :
- Last executed programs
- Focus Time of the application
The Windows 10 Timeline can be found at the location :
C:\Users\<username>\AppData\Local\ConnectedDevicesPlatform\{randomfolder}\ActivitiesCache.db
Because it is a SQLite database, it is possible to visualize it with any SQLite tool viewer. Moreover, Eric Zimmerman’s WxTCmd.exe can help us parse the database into csv.
user@machine$ WxTCmd.exe

WxTCmd version 0.6.0.0

Author: Eric Zimmerman (saericzimmerman@gmail.com)
https://github.com/EricZimmerman/WxTCmd

        f               File to process. Required
        csv             Directory to save CSV formatted results to. Be sure to include the full path in double quotes
        dt              The custom date/time format to use when displaying timestamps. See https://goo.gl/CNVq0k for options. Default is: yyyy-MM-dd HH:mm:ss

Examples: WxTCmd.exe -f <path-to-timeline-file> --csv <path-to-save-csv>
Windows Jump Lists
Windows introduced jump lists to help users go directly to their recently used per-application files from the taskbar. Jump lists can be viewed by right-clicking on any taskbar’s application. Also, the data is stored in the following directory :
C:\Users\<username>\AppData\Roaming\Microsoft\Windows\Recent\AutomaticDestinations
Jump lists include information about :
- Executed applications
- First time of execution
- Last time of execution
Eric Zimmerman’s JLECmd.exe helps us parsing Jump Lists :
user@machine$ JLECmd.exe

JLECmd version 1.4.0.0

Author: Eric Zimmerman (saericzimmerman@gmail.com)
https://github.com/EricZimmerman/JLECmd

        d               Directory to recursively process. Either this or -f is required
        f               File to process. Either this or -d is required
        q               Only show the filename being processed vs all output. Useful to speed up exporting to json and/or csv. Default is FALSE

        all             Process all files in directory vs. only files matching *.automaticDestinations-ms or *.customDestinations-ms. Default is FALSE

        csv             Directory to save CSV formatted results to. Be sure to include the full path in double quotes
        csvf            File name to save CSV formatted results to. When present, overrides default name
...

Examples: JLECmd.exe -f <path-to-Jumplist-file> --csv <path-to-save-csv>
          JLECmd.exe -f "C:\Temp\f01b4d95cf55d32a.customDestinations-ms" --mp
          JLECmd.exe -f "C:\Temp\f01b4d95cf55d32a.automaticDestinations-ms" --json "D:\jsonOutput" --jsonpretty
          JLECmd.exe -d "C:\CustomDestinations" --csv "c:\temp" --html "c:\temp" -q
          JLECmd.exe -d "C:\Users\e\AppData\Roaming\Microsoft\Windows\Recent" --dt "ddd yyyy MM dd HH:mm:ss.fff"
In the lab given within this room, we will investigate the triage folder to answer the following questions.
Questions
How many times was gkape.exe executed?
After parsing the prefetch file'C:\Users\THM-4n6\Desktop\triage\C\Windows\prefetch\GKAPE.EXE-E935EF56.pf associated with gkape’s execution history using PECmd.
Then, we get the following view of the csv output using EZviewer :

The answer is in the RunCount column.
Answer : 2
What is the last execution time of gkape.exe
The answer is in the LastRun column.
Answer : 12/01/2021 13:04
When Notepad.exe was opened on 11/30/2021 at 10:56, how long did it remain in focus?
To get an application’s focus time, we need to go through the Windows 10 Timeline using WxTCmd.exe. Hence, we parse the THM-4n6’s timeline located at C:\Users\THM-4n6\Desktop\triage\C\Users\THM-4n6\AppData\Local\ConnectedDevicesPlatform\L.THM-4n6\ActivitiesCache.db.
Then, we get the following result :
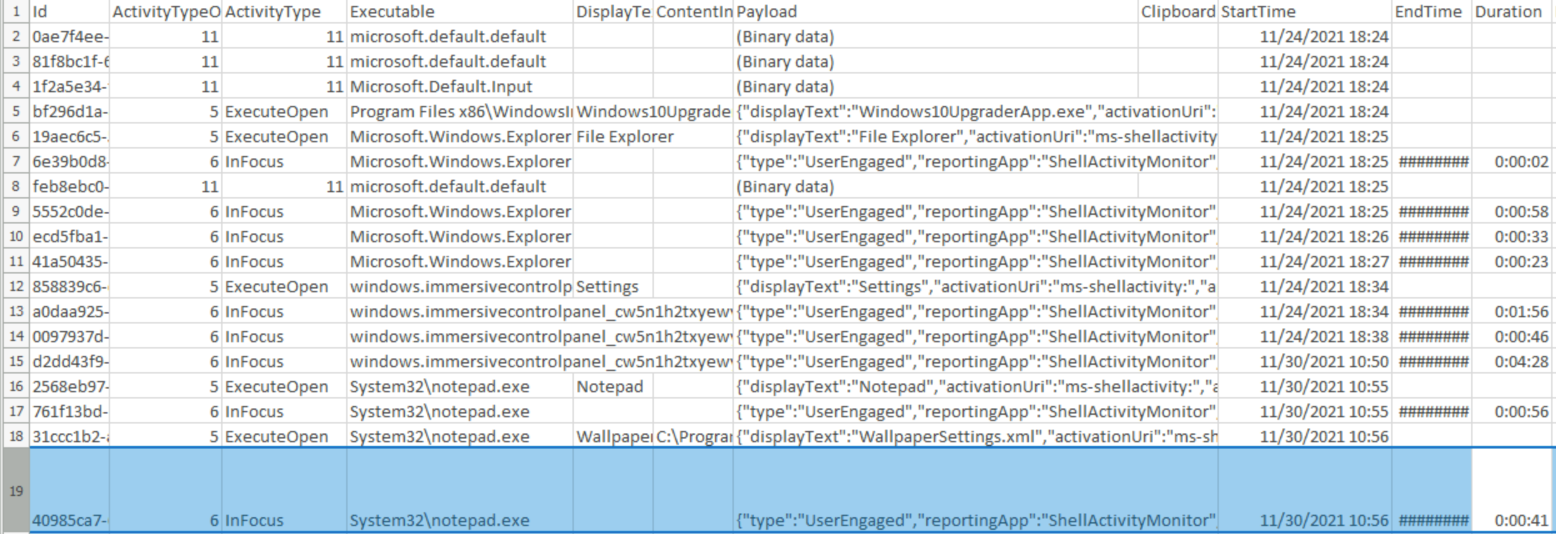
Answer : 00:00:41
What program was used to open C:\Users\THM-4n6\Desktop\KAPE\KAPE\ChangeLog.txt?
In order to get which program was used to open a specific file, we will use the information in Windows Jump Lists files using JLECmd.exe. For this, we will parse the entire directory located at C:\Users\THM-4n6\Desktop\triage\C\Users\THM-4n6\AppData\Roaming\Microsoft\Windows\Recent\AutomaticDestinations because file names are composed with the AppId of the program and not the program’s name.

Then, we parse them using the -d parameter and we get this output :

Answer : notepad.exe
Task 6 - File/folder knowledge
Shortcut Files
Each time a folder or a file is opened, etiher locally or remotely, a shortcut is created. These contains information about :
- First (creation) and last (access) opened times
- Path of the file
- Other shortcut metadata (file extention, size, attributes…)
Eric Zimmerman’s Lnk Explorer (LECmd.exe) will help us parse shortcut files.
user@machine$ LECmd.exe

LECmd version 1.4.0.0

Author: Eric Zimmerman (saericzimmerman@gmail.com)
https://github.com/EricZimmerman/LECmd

        d               Directory to recursively process. Either this or -f is required
        f               File to process. Either this or -d is required
        q               Only show the filename being processed vs all output. Useful to speed up exporting to json and/or csv. Default is FALSE

        r               Only process lnk files pointing to removable drives. Default is FALSE
        all             Process all files in directory vs. only files matching *.lnk. Default is FALSE

        csv             Directory to save CSV formatted results to. Be sure to include the full path in double quotes
        csvf            File name to save CSV formatted results to. When present, overrides default name
...

Examples: LECmd.exe -f <path-to-shortcut-files> --csv <path-to-save-csv>
          LECmd.exe -f "C:\Temp\foobar.lnk"
          LECmd.exe -f "C:\Temp\somelink.lnk" --json "D:\jsonOutput" --jsonpretty
          LECmd.exe -d "C:\Temp" --csv "c:\temp" --html c:\temp --xml c:\temp\xml -q
          LECmd.exe -f "C:\Temp\some other link.lnk" --nid --neb
          LECmd.exe -d "C:\Temp" --all
IE/Edge history
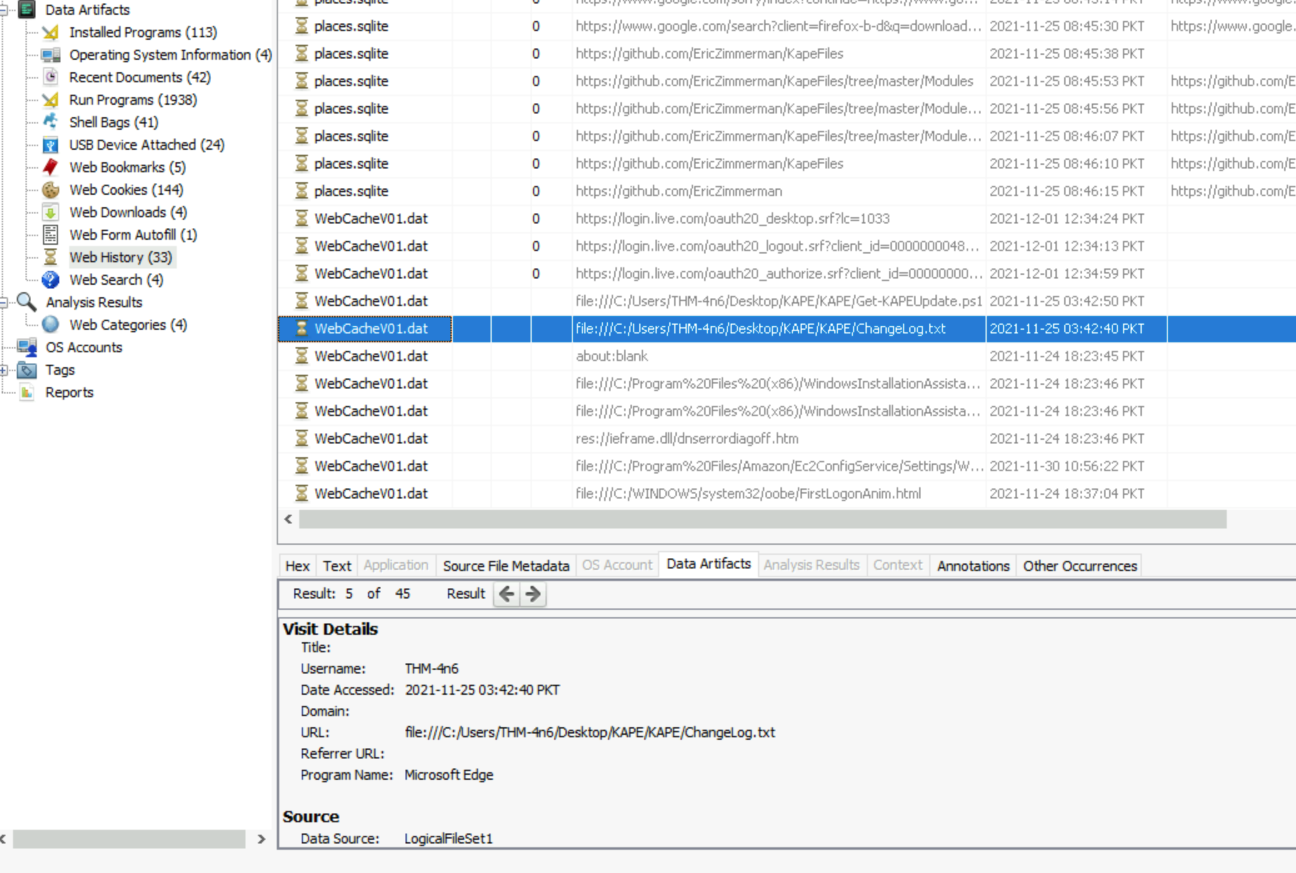
An insteresting fact is that IE/Edge browsing history also includes opened files in the system as well, whether these files were opened using the browser or not. Hence, this makes IE/Edge history a valuable source of information. History cache can be accessed at the C:\Users\<username>\AppData\Local\Microsoft\Windows\WebCache\WebCacheV*.dat location.
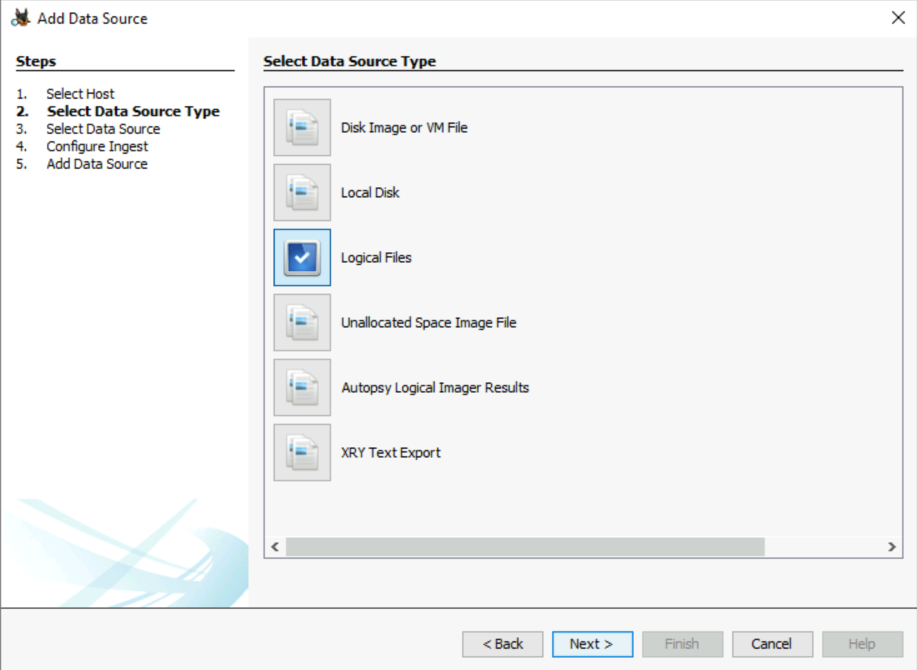
In the IE/Edge history, files/folders appear with the file:///* prefix. Despite the fact that several tools can be used to analyze Webcache data, this time we will use Autopsy. To do so, we will select Logical Files as a data source type :
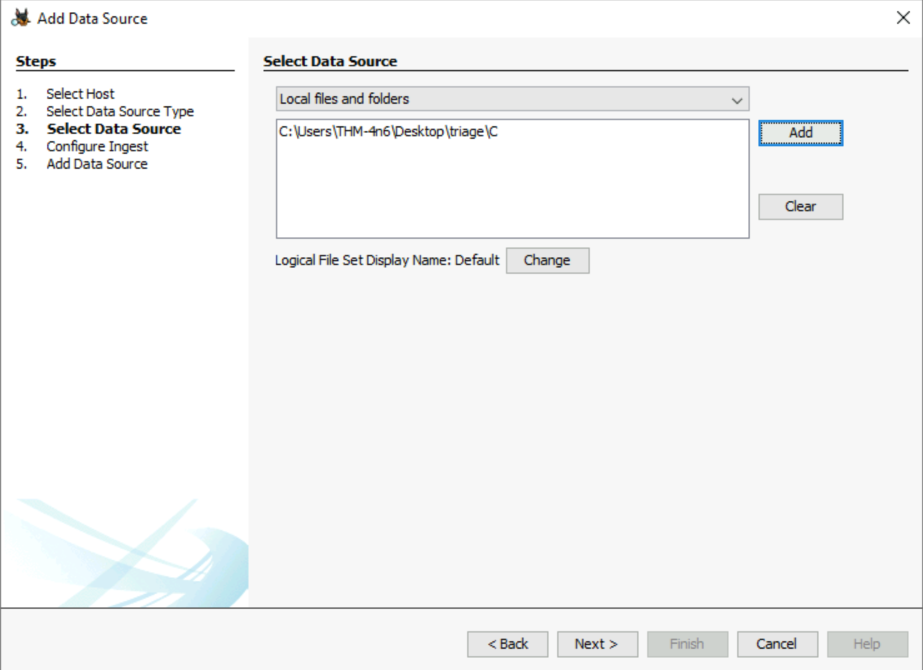
Furthermore, we select our data source location, which is the triage folder.
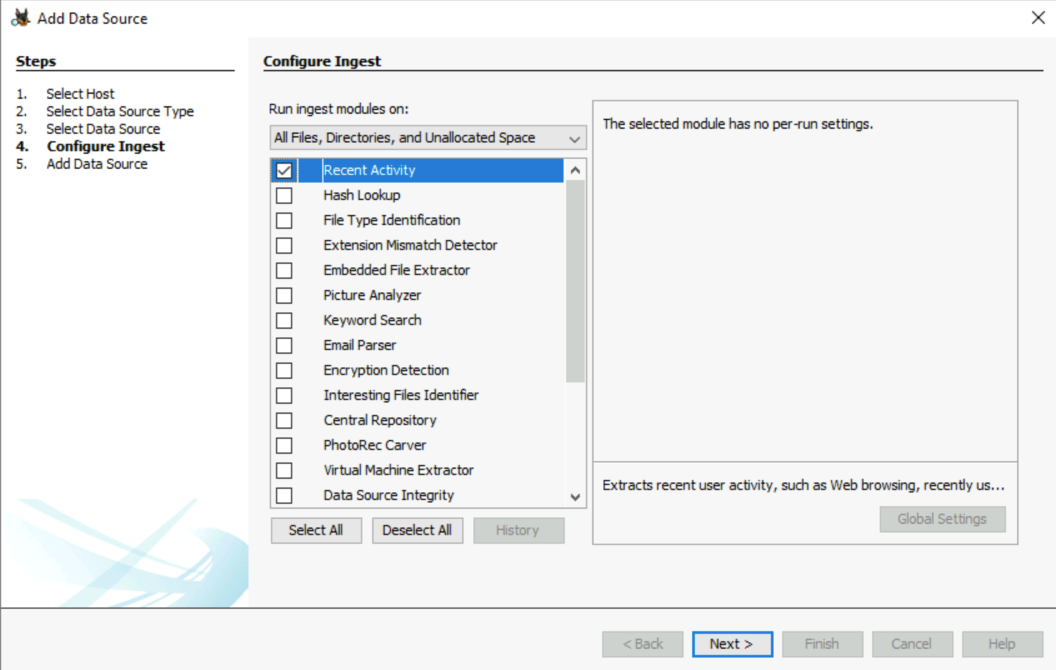
When autopsy asks about ingest modules, we will only use the Recent Activity one.
Finally, we are able to view local files in the URL column through the Web history option in the left panel :
Jump Lists
As we already learned in the previous tasks, Jump Lists create a list of last opened files per program. This helps us identify :
- Last executed programs
- Last opened files
As a remember, these are present in the following location :
C:\Users\<username>\AppData\Roaming\Microsoft\Windows\Recent\AutomaticDestinations
Questions
When was the folder C:\Users\THM-4n6\Desktop\regripper last opened?
Using jump lists and the parsed data made in the previous task, we can look when the regripper folder was last opened in the LastModified column.
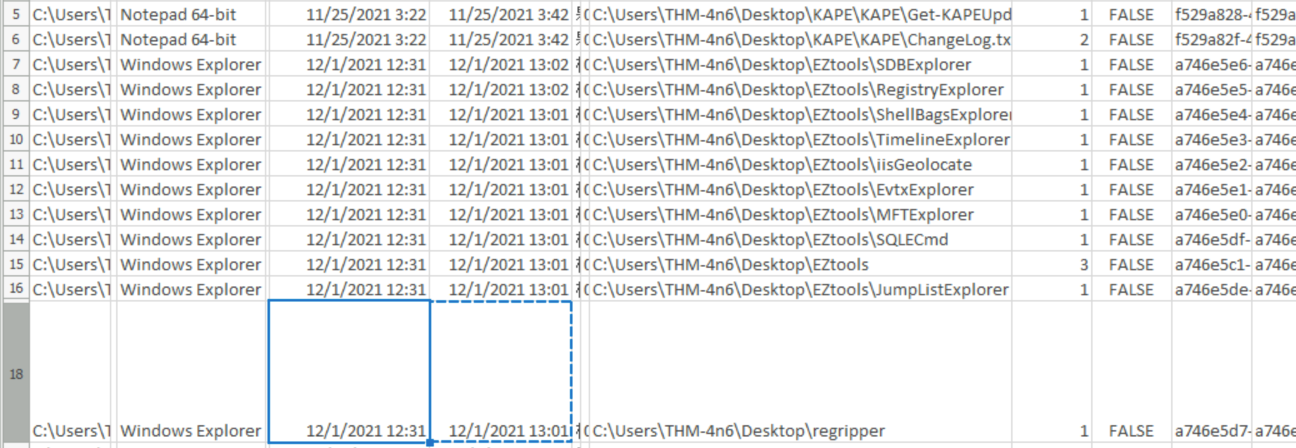
Asnwer : 12/1/2021 13:01
When was the above-mentioned folder first opened?
On the other hand, we can look when was the regripper folder first opened by looking at the CreationTime column.
Answer : 12/1/2021 12:31
Task 7 - External Devices/USB device forensics
Setupapi logs for USB devices
When any new device is attached to the system, information related to the setup of that device in stored in C:\Windows\inf\setupapi.dev.log. This logfile contains :
- Device serial number
- First/Last times when the device was connected
To illustrate, here is an example below where when a USB Flash drive is connected and disconnected :
- When a USB storage device is plugged in, the system records its serial number along with the date and time of the connection.

- When the device is unplugged, the system logs the date and time of its disconnection.

Shortcut files
As we previously learned, shortcut files are automatically created by Windows when a file/folder is opened. This also applies for files in connected USB devices and shortcuts can provide us the following information in this case :
- Volume Name
- Volume Type
- Volume Serial Number
For recall, this information can be found at :
C:\Users\<username>\AppData\Roaming\Microsoft\Windows\Recent\
C:\Users\<username>\AppData\Roaming\Microsoft\Office\Recent\
Question
Which artifact will tell us the first and last connection times of a removable drive?
Answer : setupapi.dev.log
Task 8 - Conclusion
To conclude with, in this activity we expanded our knowledge of Windows forensics by diving into advanced artifact analysis and practical techniques. We briefly explored the structure and limitations of FAT file systems, touching on how they organize data using clusters and directories. While understanding FAT was foundational, we shifted focus to more advanced systems, like NTFS, which introduced features like journaling, access controls, and shadow copies. NTFS’s Master File Table (MFT) became a key topic, and tools like Eric Zimmerman’s MFTECmd were used to parse and analyze file metadata for forensic insights.
A major focus was recovering deleted files using tools like Autopsy. By working with disk images, we learned how data could often be restored unless overwritten. This exercise highlighted the importance of forensically sound methods to preserve and analyze evidence. Beyond deleted files, we examined artifacts indicating program execution, such as Prefetch files, Windows 10 Timeline databases, and Jump Lists. Using tools like PECmd and WxTCmd, we reconstructed user activity, including program usage and accessed files.
We also studied user interactions with files and folders by analyzing shortcut files, browsing history, and Jump Lists. These artifacts revealed patterns of file access and modification, adding context to investigations. Additionally, USB forensics became a critical focus, with SetupAPI logs and registry entries providing a timeline of device connections and usage. These insights are invaluable for tracking external device activity.
Overall, this activity taught us how to recover data, analyze user behavior, and trace device interactions, greatly improving our proficiency in conducting comprehensive forensic investigations.
Enjoy Reading This Article?
Here are some more articles you might like to read next: